Surfing is more than a sport; it’s a lifestyle that celebrates freedom, creativity, and connection to the ocean. Many surfers use their surfboard as an artistic canvas that expresses their personality, style and artistry–tired of whiteboards?
Are you searching for ways to add some personality and customizing your surfboard? Look no further! This comprehensive guide will walk you through the steps needed to give it that unique edge that stands out in an ocean of sameness.
No matter your skill level or DIY experience, this tutorial will enable you to craft an exceptional surfboard art piece in the comfort of your own home.
Contents
- 1 Why Customise My Surfboard?
- 2 Get Started Today: Essential Components to Consider for Success
- 3 Surfboard Customization: Understanding the Art
- 4 Conclusion:
- 5 FAQs
- 5.1 1. I’m painting my surfboard; is any type of spray paint necessary?
- 5.2 2. Can I customize an used surfboard, or must it be brand new?
- 5.3 3. How long will it take for the paint to dry?
- 5.4 4. Could the paint affect my surfboard’s performance?
- 5.5 5. Can I still wax my board after painting it?
- 5.6 6. What’s the best way to protect my paint job against wear and tear?
Why Customise My Surfboard?
Before we explore how-to instructions, let’s investigate why custom surfboard art is worth your time and effort:
- Personal Expression: Custom surfboard art allows you to express yourself individually and creatively while making it part of who you are as an individual.
- Visual Appeal: Surfing can be enhanced by choosing an attractive board, making every ride feel special and special occasion worthy.
- Your Board Will Stand Out: Yours will easily stand out among similar-looking boards, making it easier to spot and adding an extra measure of personal pride.
Get Started Today: Essential Components to Consider for Success
You will need the following things to get started.
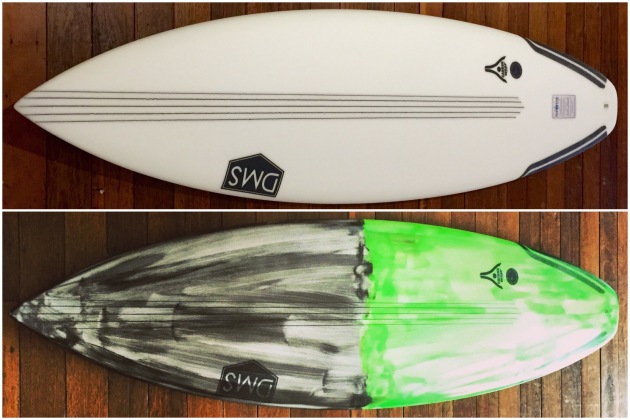
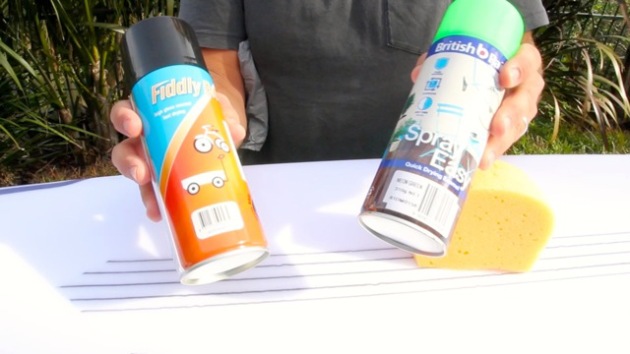
- Spray Paint: Select colors that suit your desired look; fluorescent green and black can make for striking contrast, but your palette is entirely up to you!
- Sponge: An ordinary car wash sponge will serve as your tool for applying paint.
- Plastic Bag: Protecting your hands during painting.
- Wet/Dry Sandpaper: Used to smooth the finish and create an even surface.
- Tailpad (optional): Add functionality and style with this sleek accessory.
Step One – Select Your Colors and Patterns
Decide on colors and patterns for your spray can. From abstract designs to geometric forms, your imagination is the only limit!
Step 2:
Prepare the Board For new boards, a quick wipe down to eliminate dust will do. On used boards, however, be sure to strip away wax layers before cleaning thoroughly to ensure paint adheres securely.
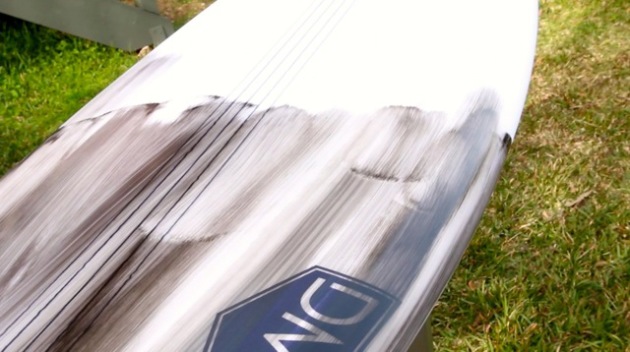
Step 3 – Spray Paint Application
Apply paint using a sponge and then your board, creating the pattern you are seeking. This step requires patience and practice in order to achieve even coverage and the look desired.
Step 4 – Let the Paint Dry
Wait 24 hours for the paint to completely dry before applying another layer, to ensure proper adhesion on your board and reduce risk of smudging.
Step 5 – Smooth the Finish
Use light-grit wet/dry sandpaper to further refine the finish. This step is crucial in creating a professional appearance.
Tips from the Pros
- Clear Coat: For added durability, apply a clear acrylic spray paint over colored coats. This will protect them from scratching or fading over time.
- Sandpaper Grade: Lightly sanding the artwork using 1200-grade sandpaper will allow you to achieve an ideal finish without damaging it.
Surfboard Customization: Understanding the Art
Draw upon your surroundings, interests or favorite art styles as inspiration to craft an original design that speaks to you. For intricate patterns consider using stencils or masking tape.
Explore various application techniques; in addition to sponge application, consider spraying directly for different textures or using templates for precise shapes.
A tailpad not only adds aesthetic and functional enhancements, but can also increase grip. Think about including this useful accessory in your design plan.
Conclusion:
Customizing your surfboard with an eye-catching spray is a thrilling way to express yourself and stand out in the surf. By following this guide’s steps, you’ll soon have created something beautiful that also tells a unique tale – yours!
Never forget, creating the perfect custom surfboard requires creativity, patience, and practice – so grab your materials, release your inner artist, and give your surfboard a personalized makeover that showcases your own unique style and passion for surfing! Happy spraying – see you out in the waves!
Custom surfboard art can be an inspiring project that strengthens your connection to surfing culture and brings more satisfaction than simply personalizing your ride.
So why wait? Get planning now on your surfboard art project, and turn your board into something that draws in attention and stirs dialogue wherever it travels.


